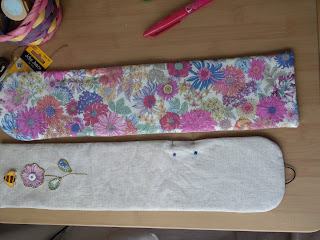
The size shown fits a 45mm Fiskars or Olfa Rotary Cutter - not sure about Clover so you would need to check. You can make it longer and/or wider if you need to - just cut all the pieces the same size. If you make the size I have shown you can actually get four from a fat quarter.
I have put the instructions for making a little elastic loop for the button but you can use a press-stud (popper/ popstud) if you prefer - it's a lot easier and you can sew a decorative button over the top to cover the stitches.
You will need:
Linen/Outer Fabric 16½" x 4½" (if your fabric frays a lot cut slightly larger and trim to size when you have finished the embroidery)
Pretty Lining Fabric 16½" x 4½"
Iron on Wadding16½" x 4½"
Iron on interfacing 16½" x 4½"
Scraps of fabrics for a motif
Buttons and embroidery floss
Fusible Web (I like Heat N Bond Lite best)
2" round thin elastic (or a press-stud)
Decorative buttons as required.
The flower I used is this shape and is about 1½" across - trace one from a book or just freehand draw one - that's the beauty of floral things, they don't have to be any shape. Try drawing an amoeba shape and putting a spiral in the middle to represent a rose.
Use tear-drop shapes for leaves֏💧💧💧and then draw a little stem in.
The design area for this is 3¾" x 1¾"
Remember to reverse any shapes when you are using fusible web as they come out the mirror image when they are finished.
So..... trace the design on to fusible web. Cut out leaving a small margin all the way around. Iron on to the reverse of the fabric and cut out on the line.
You need the design to start about 2" from the top. Lie your piece out to make sure the design is not going to be too big, or long. Audition it by folding the shape to represent the finished article.
Next iron some interfacing on to the back of the outer fabric (careful not to get it stuck to the iron - it's a pig to scrape off!). Don't press the embroidery too hard or you will flatten the stitches. I sewed a little button to the centre of the flower at this point.
Trim the shape to the exact size and mark a ¼" seam all the way around. Take a round shape - I used a glass to round off the end OPPOSITE to the motif.
Mark the centre point - then sew the elastic loop on TO THE RIGHT SIDE OF THE OUTER FABRIC, making sure you completely anchor it to the fabric or it will pull through later on. Note the position of the loop which looks upside down but will, of course, be the right way around when you turn the case the right way around! This loop was sewn quite wide to accommodate the button which was about an inch. Check your loop against the button to make sure it is not going to be large - there is nothing worse than a flappy fastening!
Iron the fusible wadding on to the back of the pretty lining fabric.
With right sides together sew the outer and lining units together leaving a gap to turn at the curved end of the piece which is at the back when made up. Be as accurate as possible otherwise your finished article will look wonky.
Trim around the curves and clip the corners to reduce bulk. Turn right sides out and pin or tack the opening. Press gently.
PLEASE NOTE THE ABOVE PICTURE IS OF TWO CASES SIDE BY SIDE
Now fold the case into its finished position. The front folded up will measure about six inches. You can adjust this a little so that you are happy with the way it looks.
Mark the position of the button and sew on or attach the press studs. Doing it now will ensure that it is in the right place when it is sewn together. Make sure the fastening is centred. Refold to check everything is in the right place before you start sewing the sides together.
When you have sewn on the fastening re-fold the case and pin into position. If you have a walking foot it makes it easier but I have done it without - just make sure you keep the edges flat and feed it through the machine slowly.
I like to have there pretty lining showing
Using a small seam - about an eighth of an inch - start sewing at the bottom edge (where my finger is pointing). Make sure you catch all the layers together, especially when you get to the bit where you turned the case right sides out
Sew all the way around, including the flap, and end up at the opposite side. Take the pins out as you reach them to keep the seam from gathering up under the needle.
Leave a tail of thread at each end to sew in, don't just clip the threads as they may start to unravel.
Sew the threads in with a large eyed needle and you're done!
This case also fits glasses and crochet hooks.
I've tested this pattern but if you see any mistakes in the instructions I would be really grateful if you could let me know.


No comments:
Post a Comment